
Note: Some of those stoves drill easily, others are hard as diamonds. It all depends on the metal that the manufacturer uses. If you have trouble drilling the screw holes in the stove, mark your screw hole locations and take it to a machine shop. They can pop the holes in it with a carbide cutter for a couple of bucks.
Hi, Steve
What do you use to open the front holes of the firebox?
A regular old hole saw mounted in a drill. Use a block of wood behind the metal as you are drilling.
Hello Steve,
I’m attempting to drill the holes to mount the firebox to the stove but I am not able to drill through the stove. I am using a 1600 rpm drill and a titanium drill bit….both Ryobi. What did you use?
It seems like some of the stoves drill out easy as butter, others eat drill bits for dinner. I think the steel used in these stoves varies greatly in hardness from lot to lot. If you got one of the hard ones the best thing to do is to mark the hole locations with a felt tip marker and take the stove to your local machine shop. They can pop the holes in it with a carbide cutter for a few bucks.
Took me awhile to find a machine shop that would drill the holes for me but I have it done now so the next questions:
1. What size are the holes on the firebox?
2. Where should these holes be located?
Glad you got he screw holes drilled! The air vent holes are 1 1/2 to 2 inches in diameter. I put three in front of each burner. Use a hole saw and be sure to back up the metal with a block of wood when drilling these. See the other firebox videos for more info.
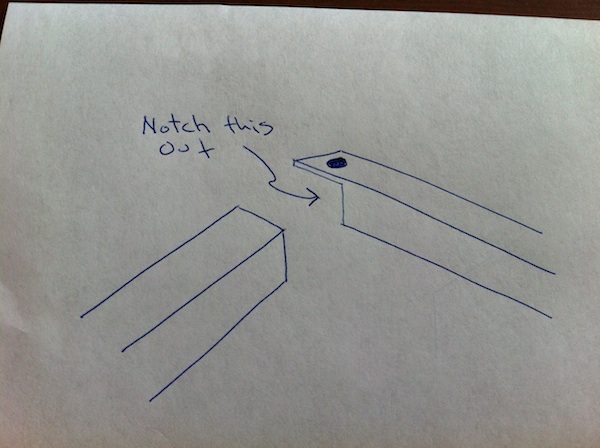
Would like to see the un-mitered corners you did – close up… Looks like you notched the top part of it out? If so, how? If not, what the heck did you do so that one bar doesn’t overlap the other or leave a gap (my Health Dept. doesn’t like gaps)?
Nothing fancy. Just a butt joint.
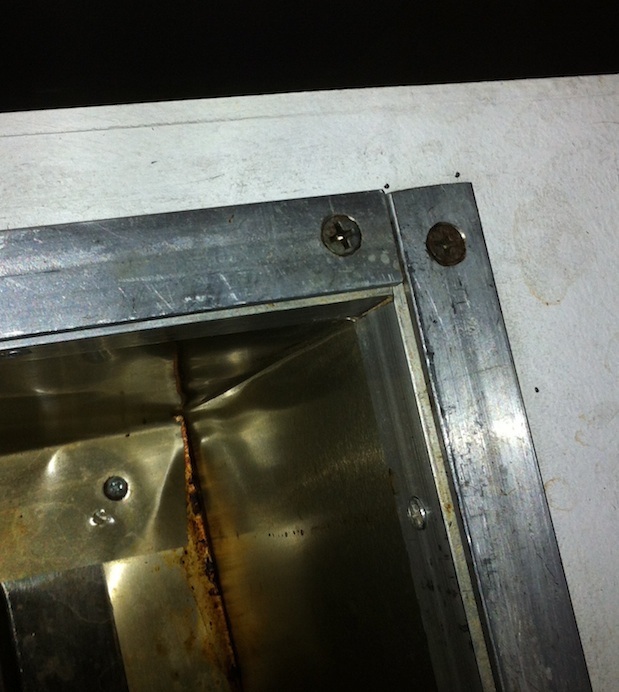
I was actually wondering about the pieces of aluminum angle trim underneath the flat trim piece pictured above. Isn’t there a ‘v’-shaped gap under the corner of the top trim (the reason you’d want a miter cut, I’m guessing? Or maybe I don’t understand why you mentioned the miter cut in the 1st place…)
Thx
Oh, I see. Here’s a fancy schmancy drawing… The two pieces butt up against each other.
what size counter sink do I need?
1/4 inch or slightly larger.
Why is the burner offset to the left and not centered?
We did that in order to place the burners under each pan. The left pan is a half size pan.
instead of trimming the flashing can I just bend it over and double the wall for re enforcement?
Yes, I suppose that would work. If you do, make sure that you fold the extra to the outside. If you fold it to the inside you will create a heat trap which we don’t want to do.
I had a burner that was very hard and would not drill. I marked where I wanted the holes and then with a block of wood tight under the burner, I used a metal punch to punch a very small hole in the metal. With that kind of a start, my drill bit quickly went through the tough metal.
Hey Steve can u use they aluminum that’s painted with white on one side and red on they other.
No, the paint will burn. Get plain unpainted aluminum.
Steve,
My wife and I will be frying (not dogs!) and want to either recess the stove with just the burners above the wood top (luan), or just set the stove right on top (no recess)? Will we still need to build the firebox (just not as deep of one)? Also, if no firebox is needed, whether we recess the stove (or not), will we need to anchor the stove to the surface it is setting on? (I realize per your video that the stove needs the rubber feet on for airflow…)
(ps) Received the plans/videos yesterday here in Columbia. Thx for the quick delivery!
Jeff
Hi Jeff,
The simplest way would be to just mount the stove on the work surface without recessing it. I would definitely anchor the stove. An easy way would be to replace the screws that hold the rubber feet on with longer ones. Drill four holes in the work surface and run the screws up from underneath with washers on them and tighten the stove down. Be sure to use the feet to raise the stove up for airflow like you said.
At the 2:40 point you talk about cutting a piece of flashing and covering the open space.
Can that be usable space? Is using a 3 burner stove an option? If so are there any pros/cons?
Thanks.
Hi Jim, the great thing about building your own cart is that anything is possible. You would have to do some backyard engineering. Be sure to check the width of the cart and compare it to the combined width of the pans that you want to use. Make sure you have enough room before you start on this mod.
Is there anything you can do to keep the box from rusting?
The box is made from aluminum which does not rust.
Hey Steve, question, why do we need 3 holes in front of each burner?
That’s what I did on the prototype and it worked great. You might be able to get away with just one. Try it and see if your flame is still strong. You can always add more if you need to.
TIP! you talk about drilling thru the aluminum bar and angle, and not to drill to deep as then you will have an unwanted hole. I just happen to be a lock smith and I have to deal with stripped out holes in wood all of the time. You might already have heard this, but for those who have not , here’s the fix. Put some Elmers glue in the hole then put as many tooth picks as you need in the hole, put the screw in. Once it dries, god as new!
Awesome top Tom. Thanks!
Steve, Is the pilot hole that the trim pieces will be screwed to going into the top cover and not the frame of the cart?
It goes into the frame.