
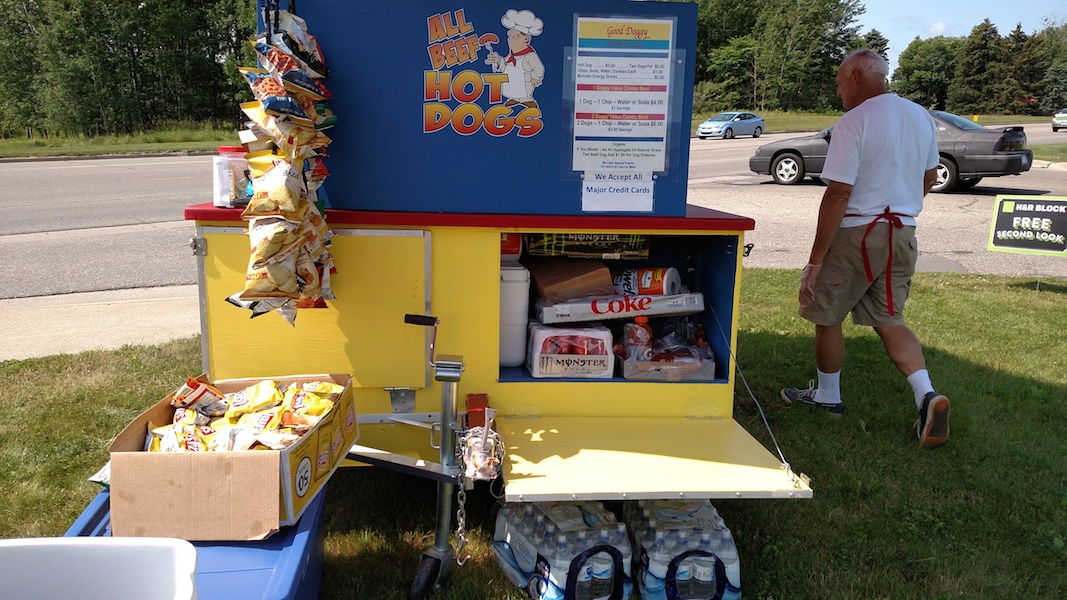
SINKS By watching the construction videos, you will learn how to build a sink. You can use this knowledge to build multiple sinks if your county requires them. We use a round sink in the video, but for multiple sinks in a side by side arrangement square sinks work better. You can make these out of 1/6 size steam table pans. Save a few bucks by buying them used at a restaurant equipment supply company. Multiple sinks must be fed by a swivel faucet that is long enough to reach each individual sink.
TRAILER SWIVEL WHEEL MODIFICATION The swivel wheel on the front of the trailer may in some cases need to be removed before towing. If you have a low tow vehicle, insufficient ground clearance may cause the swivel wheel to contact the ground on uneven roads. This may damage the wheel, trailer, or tow vehicle. Following is one solution. You will understand it better after watching the videos: Remove the swivel wheel assembly. Slide a steel plate over the U bolts above the top of the wooden spacer block and fasten down with nuts, place the swivel wheel assembly under the trailer tongue, then place a removable steel strap above the tongue and fasten to the u-bolts with wing nuts so as to be quickly removed and reinstalled. The swivel wheel assembly could then be mounted upside down (on top of the tongue) for travel and flipped into position at the site before unhitching the trailer.
An even simpler fix is to make the mounting block short enough to give you adequate road clearance when hitched to your tow vehicle. Mount the front swivel wheel assembly permanently to the trailer tongue. When you get to your location, unhitch the cart. The cart may be quite “nose down” at this point. No worries. After rolling your cart into position, pick up the tongue and place a jack stand under it to level the cart. Chock the main wheels to keep it from rolling.
ADDING A GRILL Click here for a step by step grill installation tutorial.
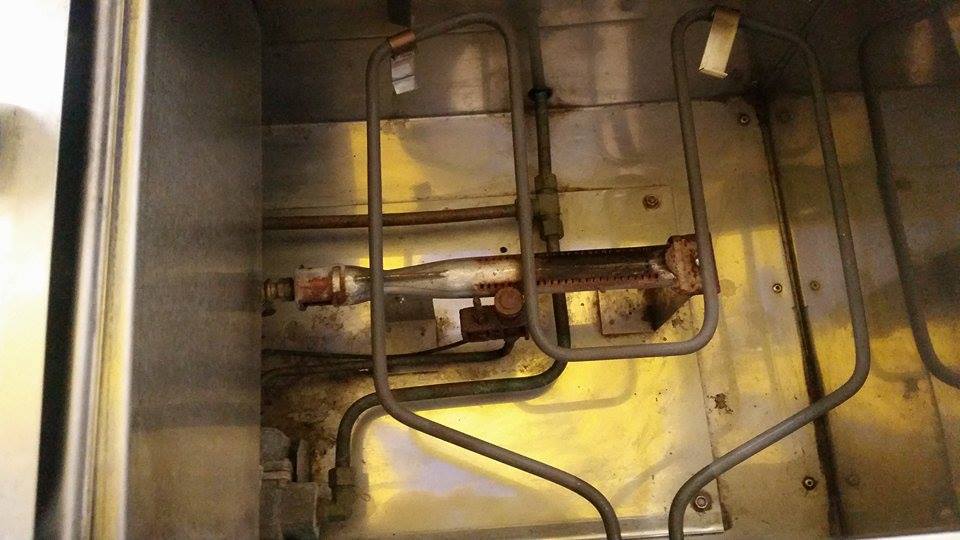
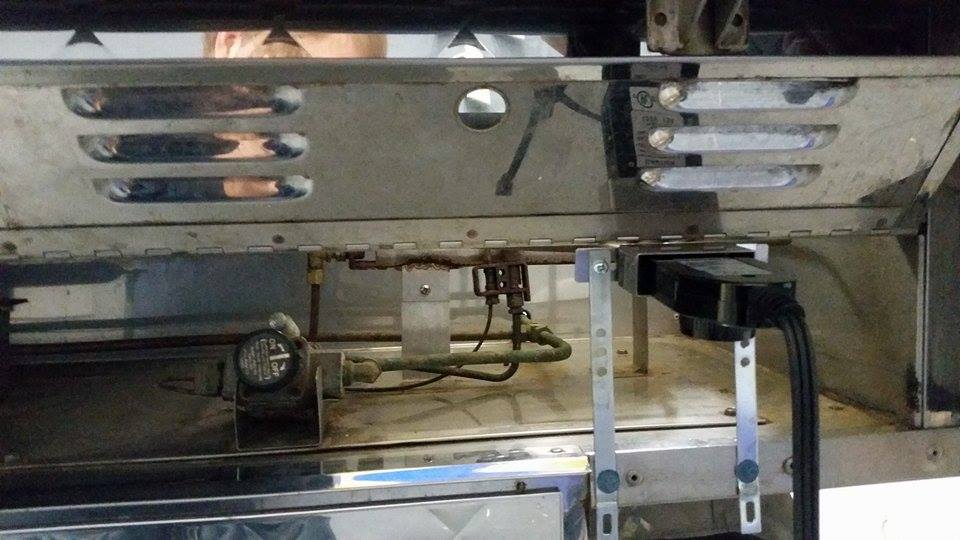
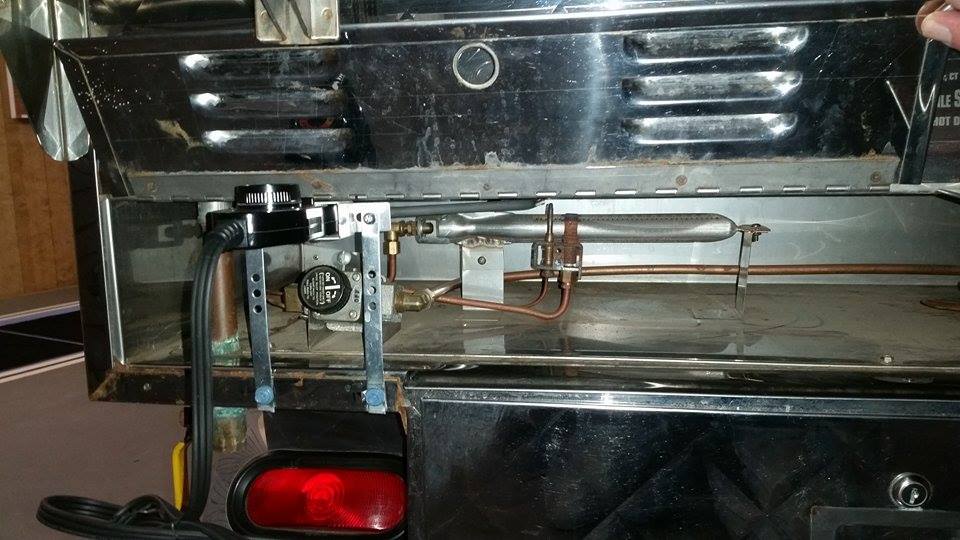
ELECTRIC CONVERSION Premium member Joe Demuro converted his hot dog cart to electric, while retaining the gas burners. He was kind enough to allow me to share his conversion with the rest of the HDPP community. Thanks Joe!
Hi Steve, I just wanted to give you an update. I bought two electric smoker replacement heating elements. Each are 1300 watt, 110 V with adjustable mounting bracket and element support feet. I made a few simple mounting brackets and it work’s great! cheep fix if you need to make your cart electric. I was able to leave the gas burners in place as well, so in the summer all I need to do is remove a few self tapping screws ( sheet metal screws ) and gas on! I am looking forward to this indoor flea market, to see how I do. – Thanks Joe DeMuro
Joe performed this conversion on a manufactured cart, but you could do this to your E-Z Built by cutting a hole in each side of the side of the firebox and routing the handle and knob out the hole. When you want to go back to gas, remove the electric elements and patch the holes with a piece of aluminum secured with sheet metal screws.
Click the pictures for a larger view…
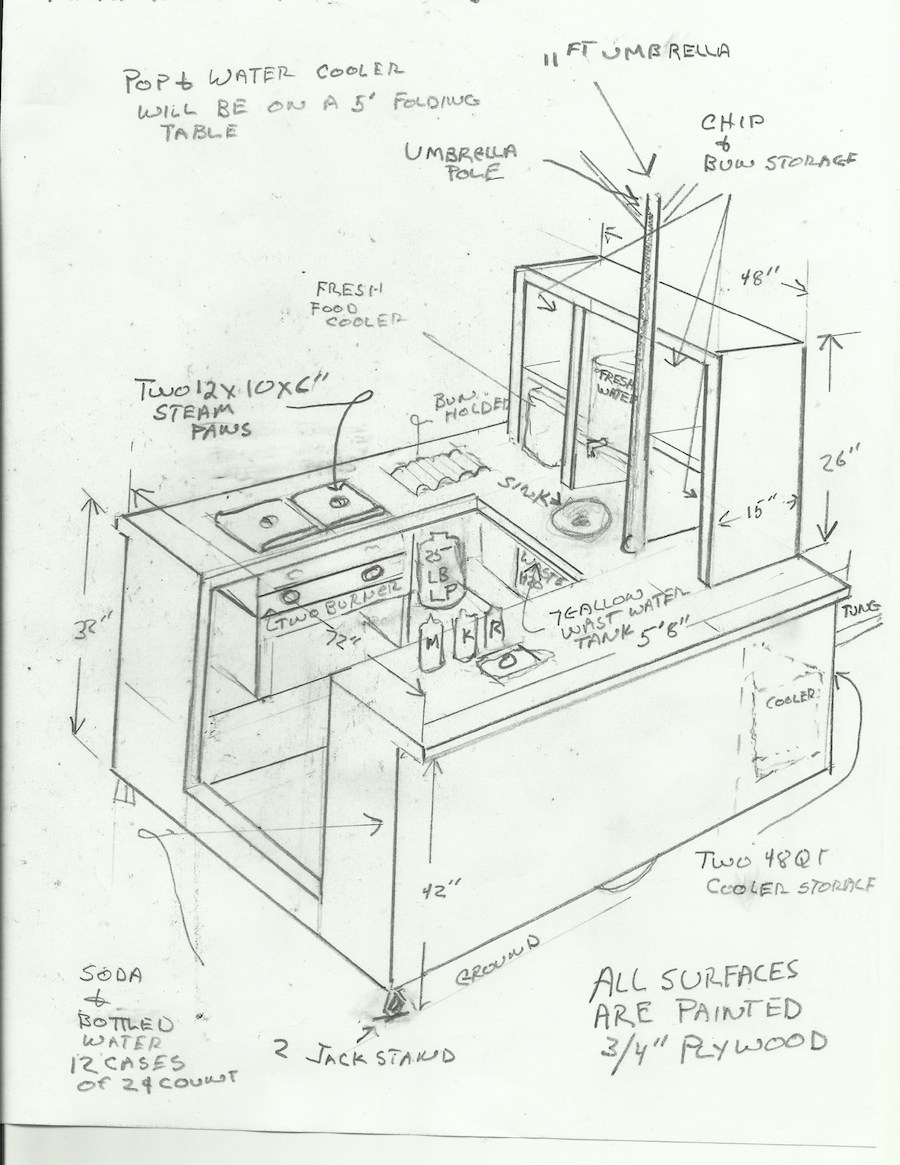
FRESH WATER TANK MODIFICATION The water system on this cart was initially designed to be a gravity feed system. This is why the fresh water tank is mounted above the cart body in the “tower”. After building the cart and testing the hot water system, I determined that a 12 volt water pump would provide superior performance. Since we are now using an electric water pump, you may mount the fresh water tank anywhere you like. You may want to keep the tank in it’s current location to save storage space inside the cart body, or you can mount the tank in the cart body next to the waste water tank in which case you can run the water line through the cap instead of cutting a hole for a “cooler drain” in the bottom of the tank. The choice is yours.
Check out Tony’s Shave Ice cart – built with the E-Z Built videos and plans. Click here.
Drop Mounted Tank. Premium member Chris Tackett got some help from his father while building his E-Z Built and they came up with a great space saving mod. Chris writes…
“My dad helped build a box under the cart for the cooler drain which opened up space under the stove. Is there a lot of heat under the stove? Also got a start on the gas lines and got the mounts for the water tank and cooler secured! YEAHYA!”

Looks like a simple box held to the frame with steel straps (these are sometimes called “mending braces” at the local hardware store).
Great job Chris and Dad! No, there is almost no heat directly under the stove so it’s a good place for storage, however be sure to leave a few inches of air space directly under the stove for airflow, and I wouldn’t store flammable things there (such as paper products) just to be safe. This would be a great place to store an extra 2 burner stove which you could take out and set up on a shelf or table for grilling onions and/or peppers.
Stevie Guzman’s Waste Water Drain Modification.
Stevie had trouble with the stock drain leaking so he installed a brass valve which will last much longer. Check out the video he kindly sent us…
 
Mark’s Drop Floor Stand-in Cart
Mark moved the rear frame rail of the trailer forward 30 inches. He took a 2 x 4 laid it flat and bolted it to two thick pieces of plywood which hang down from each side rail at the rear. This allowed him to drop the floor below the level of the frame and make a stand-in cart. He also built the cart body as wide as the fenders which gives him tons of storage. It wouldn’t take much more work to add walls or plexiglass windows to fully enclose this cart for winter vending. He shared his construction drawing, pics, and a video with us. Thanks Mark!
I LIKE THAT.I’M CHANGESOME THINGS AROUND N MINE I’LL GET SOME PIC. HAVEN’T BEEN WORKING ON IT FOR WHILE TO COLDOUT THERE .I’M PUT IT TOGETHER ON MY FRONT POUCH.GOT IT FRAME UP COOLER IN WATER TANTS UNDER IT NOT MOUNT YET GOOT MY FRAME PIANTED.GOING TO HARBER. THIS WEEK END GET STOVE.WATER PUMP.SOME OTHER STUFF.ITS COMING ALONE SLOWL’Y.THANKS U ALL. HILLBILLY [KEVIN ]
sorry about spelling key board mess up hit one key types somthing else ..got my stove and 10 qt.fryer .now if it just warm up soon get back to work on it……. thanks u all ..hillbilly [ kevin ]
Always looking forward to some new pics and ideas. Great start Hillbilly! Keep us all posted!
Scooby
I’m watching for your updates Hillbilly
I’M HOPING SOON I CAN START WORKING ON IT GOT LOTS OF STUFF TO DO AND PUT ON IT…WE GET 50’S AND 60’S
THEN GETS COLD SOON IT WILL STAY NICE. THANKS HILLBILLY [KEVIN ]
Good weather is coming!
Hi
Hi Dane.
Hey there I live here in Dallas texas and while reading the mobile food vending guidelines it states that all hot dogs must be under mechanical refridgeration any help with this? It actually says two different things at one point it says any cooler holding food must have a thermometer and then at another point it says potentially hazardous foods must be kept under mechanical refridgeration. I was wondering if there was a way to integrate this onto a EZ build cart.
Thanks,
Afro Jo
Hey Afro Jo,
Hot dogs are not classified as potentially hazardous so the mechanical refrigeration requirement should not apply to you. Many of our members do build a small fridge into their cart so they can serve a wider variety of foods. Always check with your inspector first of course.
I am building my cart right now. I went with the slightly heavier trailer frame with the bigger wheels. I have built two boxes underneath that will house the wastewater tank, the other will have the battery, and charger inside. They will be accessible from inside the cart by a flush trapdoor with the flush type handles that fold flat when not being used. The cart will be 5×4 when finished….if you guys want pics I can send some…
Yes, absolutely. Email them to steve@HotDogProfits.com and I’ll post them here in the member’s area. Thanks!
Thanks Ross!
Ross,
I too purchased the 1090 lb Utility Trailer. (you all can get 20% coupon codes at Harbour Freight, just google). For November the code is #16045843.
My question is will I need a larger than 8″ Castering wheel to accomodate the higher bigger tires from obtaining the bigger trailer?
Thanks!
Rosie
I answered my own question. Yes, I would need a 12″ swivel castor to accomodate. 🙂 I looked up the specs on the wheels.
Very good!
That would work. Or you can make a taller spacer block.
The pictures look great! However could you give a quick explanation on what the lower boxes are for, and what is going where? thanks mike
He chose to mount his water tanks below the cart floor to allow for more storage space inside the cart.
More from Ross…
Hi Steve,
Hope your having a good day. I had a friend who happened to have a 15 gallon rv water tank lying around and gave it to me! I had to refigure my design but it was too good to pass up! I made a trip to Home Depot to get a few fittings but other than that I’m in business! I redesigned the front to accomidate two propane tanks…hope you like it!
Ross…
How far over size did you go in length and far deep did you go ? To sink the tanks in the trailer frame. Thank you Larraoke
I don’t have any dimensions from this modification, sorry. It wouldn’t be hard to do some measuring and come up with a solution to do this mod on your own cart.
Started mine and I am just about complete with the frame. It will be a side serve electric cart. Really liked the idea of a table over the tongue!! That’s a doer for me! I’ll post some pics as I near completion.
Thanks Rick! I can’t wait to see it!
hi steve, im working on installing my pump for the plumbing video. im wondering will any 12v pump work? and did you take off the power cord??
Use the pump that I recommend in the plans. It’s a Shurflo Nautilus. If you use too big a pump it will blow off your water lines or run out your water tank in 10 seconds.
Will the SHURflo 100-000-21 12 VDC Single fixture Delivery pump 12 VDC 1 GPS Open Flow, work for us?
Yes, it should.
That is some great information and ideas there. I am building out the 4×8 version of your cart with the twelve inch tires.
I am actually going with the side serve setup with dual hotboxes on the right side of the cart. I will be incorporating a grill for the topside deck that will also double as a griddle plate. I will post pics of the current progress soon. I also built in a space for a beverage cooler that will be electric. Any pics or ideas or other suggestions on designs for a 4×8 trailer would be appreciated.
I’m trying to keep in mind good customer experience and good flow from the cart. Its tough trying to decide on good design but not waste precious cart space. Before I saw the water tank modification that Russ did I also started pondering about alternate locations for some of these tanks as well. I Like Russ’s idea and will see if I can come up with a similar setup on my cart. It’s tough trying to keep things simple but as any good builder or fabricator knows, there is always room for improvement. Thanks to everyone for your posts and ideas. Also, Steve was not kidding in his video when he said be careful and certain as you pick out good lumber. Most of the bix box stores have average quality lumber. searching through what seemed a large number of bundles of 2×2’s was not fun. I was amazed to get any really straight piece of wood. No kidding, most of the wood looked like twisted wrought iron. Its bad enough when it’s bowed one way or the other but the twisting of the wood was maddening. I can tell you from direct hands on experience that even a slight bow in a plank that is 8 foot long can mean many adjustments later as you start to close up the frame. Be attentive to detail and select the straightest wood you can get without wasting your day. Keep your stored wood in good storage area and keep it stacked and if possible keep it pressed flat. Any heat, humidity and cold air will cause any slight imperfection in your wood look much much worse and I am finding this out. I have luckily wound up with about a one eighth or less out of square but not enough to slow me down at this point. Can’t wait to get this rig on the road!
Great advice Willie. Yes, straight wood is getting hard to find but if you take the time to choose straight pieces you will be happy you did.
Hey Steve ~ When filling the fresh water tank how do you know when it is almost full? Do you keep disconnecting the hose to check water level or do you have some little trick?
Edd
Here is a little trick. Don’t fill it directly from a hose. Get another tank the same size as your freshwater tank, fill it with water, then use that to fill the tank in your cart. As long as the cart tank is pretty much empty, you can’t over fill it. I actually added a hose that connects from my filler tank to the fitting on my cart so I don’t have to stand there and hold the filler tank.
I just love all the questions and the great answers to them. I heading to the health inspector tomorrow with the plan in hand.
And also some borrowed pics to give her an idea of what’s out there. that is similar to what my plan is.
Thank you to all you “Slingers” And special thanks to you Steve.
Lynn
Good luck Lynn!
Hi Steve, I was just wondering about Marks stand-in cart design. What is the ground clearance of the dropped floor? If built on standard trailer 8 in. wheels, or is it on the HD model trailer, with larger wheels?
Thanks for all the info,
Lynn
Hi Lynn,
I would use the larger wheels. It would allow you to drop the floor a bit more. As for ground clearance I would suggest six inches minimum. And that depends on how your cart sits when it is hitched to your tow vehicle. If it hangs tail down, you might want to get a drop hitch for your tow vehicle.
Maybe I missed it, but if my son & I wanted to build this cart what would I submit to the drawn plans to the county?
Hi Mike. Go to the schematics section and print off the drawing.
https://hotdogprofitspremium.com/e-z-built-hot-dog-cart/health-dept-schematics/
Hey Steve I read a comment that a slinger was building out his cart 16 inches on each end as long as I do the same and reinforce with 2x4s will this be ok I also already beefed up my cart with 3/4 plywood on bottom and 1/2 on the top ? Thank you larry
The cart body can hang over the metal trailer frame a considerable amount without additional reinforcement. Just be sure that it balances slightly nose down and that you have clearance to make turns without the front corners of the cart body hitting the tow vehicle.
Yeah they make a tow adapter 12 inches long so you can add that extra space in going twelve inches over in the front you buy the adapter at harbor frieght so maybe I’ll go slightly longer in the back maybe 15 inches in the back thank you
Yes, that’s a good plan Larry.
D’ Barrel Dogs
Wow I like the ideas, and pointers, keep them coming.
Mahalo!